
Sometimes, you plug everything together and it just doesn't work. In this case it's good to be able to figure out what part is broken. Here is a step-by-step guide to help you figure it out. I assume that your radio is transmitting, and if it's not there really is no way to know. If none of this stuff works, you can assume that your transmitter is at fault, but that's usually the last thing to go wrong. This guide only applies to 72MHz systems with electric motors, and assumes that all your parts are quality parts. If you have low-quality parts, the first thing you want to do is replace them with higher quality parts and see if that fixes the problem.
First, plug everything together like in this video:
RC Wiring
OK, now what is the problem:
Servos don't move and motor won't start:
1. Possibly "transmission not received" - see below
2. Check the battery with a voltmeter - should be 4.2 volts per cell if using Lipo, and 1.2 volts per cell if using Nicad/NiMH. Charge it up if it's not fully charged.
3. Make sure the ESC is properly programmed for your battery type.
4. Try using a receiver battery on the receiver. If this works then you probably have a bad ESC, or the ESC does not have a battery eliminator circuit (BEC) or the BEC is not functioning. Replace the ESC with a new one that has a BEC.
5. Try reversing the plugs into the receiver on the servos and ESC. They won't work if plugged in backwards, but it won't harm them.
Servos work but motor won't run:
1. Check all the connections with an Ohm-meter. Make sure they are tight and conducting.
2. Make sure the motor isn't shorted or damaged. The easiest way is to try another motor that you know works properly. The other way is to test it with an ohm-meter or testing lights. For brushed motors, you should be able to run current through the leads and there should be no current between the leads and the housing. For brushless motors, there should be connectivity between each of the three leads to the other two, and no connectivity between any of the leads and the housing.
3. Try reversing the throttle channel on your radio
Motor runs but servos don't work:
1. Try reversing the plugs on the servos into the receiver.
2. Try different servos.
3. Try the same servos in different channels.
4. Try replacing the ESC - if this solves the problem then your ESC is bad, or it does not have a battery eliminator circuit (BEC) and you will have to use a different ESC, or use separate battery to power the receiver.
5. Try using a receiver battery plugged into the receiver. If this works, then again, your ESC is bad or its BEC is not functioning or it doesn't have a BEC.
Motor starts and stops or servos randomly move:
1. This is almost always a sign of "transmission not received"
2. Make sure the transmitter is on full charge. Some radios will have a very weak signal when the battery is down to 60-70% charge. Make sure it is charged up all the way.
3. Pull the antenna up on the transmitter and see if this helps. Make sure the antenna is screwed tightly into the base.
4. If you've done all that and the signal is still not received, continue in this list.
5. Check the receiver antenna. It should be fully extended, with no loops, and should not be touching any metal parts. It should be firmly soldered to the receiver.
6. Check the receiver crystal. It should be pushed all the way in and taped in place so it doesn't jiggle loose. Loose crystals are a common problem.
7. Check to make sure the channels are correct. Your radio will have a channel number on it somewhere, like "72.150" and the receiver crystal should have the exact same number marked on it. If these numbers are different, nothing will work and you will have to replace the crystal with one for the correct channel.
8. Replace the receiver and crystal with another one. If this does not solve the problem then it is likely that your transmitter is bad. Send it in to the manufacturer and have them fix it. You can not service your radio per FCC regulations. Don't even try it. To confirm that the radio is bad, you would need another one on the same channel, which you are sure works properly, and test to see if the signal is received from that one.
This guide only covers the most common problems, and there are many other things that can go wrong. If you haven't checked all this stuff though, please check it before you post a question on a forum. I will add things to this guide when I discover them, so please let me know if there's a problem you can't fix.
Over and out!
Jasmine
Thursday, December 27, 2007
Tuesday, November 27, 2007
Saturday, November 24, 2007
Friday, November 23, 2007
Thursday, November 22, 2007

Saturday, November 17, 2007
Pitts Biplane takes a lot of abuse!
Here's onboard video of my Pitts Biplane flying in too small of an area to line up a proper landing. It did have a small crack in the wing but otherwise it's all good :)
Wednesday, November 14, 2007
Slow Stick Field Goal
Flying my Slow Stick in a little bit of wind. It is hard to keep it going in one direction when the wind is gusty. I did not mean to make the field goal at the end :)
Monday, October 29, 2007
Slow Stick Up High
Flying my Slow Stick way up high. This video was longer and I flew a lot higher, but the file was corrupted by a crash later in a different plane, so I guess I was lucky to get this part. See the menu on the side for the crash video.
Sunday, October 28, 2007
GWS Formosa Onboard with Crash
Video from onboard my GWS Formosa. Crash at the end was due to total loss of radio control. Nothing I could do.
Saturday, October 27, 2007
Friday, October 26, 2007
Slow Stickin at the Park
Park flying with my GWS Slow Stick. There's less camera vibration at the new location on the back of the wing.
Thursday, October 25, 2007
GWS Slow Stick onboard video
Here's some onboard video from my GWS Slow Stick. The camera was shaking from the motor vibration, otherwise it would look a lot better. Still pretty good I think.
Friday, October 12, 2007

Saturday, September 29, 2007

Wednesday, September 26, 2007
Video - Wiring up a 3-channel brushless electric system
Here's a short video showing how to wire up 3-channel brushless electric system.
Monday, September 24, 2007
Art-Tech Pitts S2-A
Click for the flight report.

Art-Tech Pitts with brushless motor and my own Berg Receiver.
Click for build log

Art-Tech Pitts with brushless motor and my own Berg Receiver.
Click for build log
Pitts Biplane Build Log (Art-Tech, Sapac, Hobby-Lobby)
(Click here for the flight report)
This pretty little biplane is a decent quality kit, and is very similar to some kits from GWS and other Chinese builders. It is made of a fairly heavy foam, and I'm not sure what exactly it is. The decals look beautiful, but they scratch off fairly easily, so be careful. Overall, I'm fairly happy with this kit, but I haven't flown the plane yet. I will edit this report and include a flight report after the maiden voyage. My kit came with a brushless motor, and cheap radio which uses 8(!) AA batteries. I also got a charger, Lipo battery, and free "LipoSack", which is fireproof Lipo charging safety bag. It can be ordered in this configuration from Hobby-Lobby, for around $235.
http://www.hobby-lobby.com/pitts-bipe.htm
1. OK, the first thing I did was to get rid of the cheapo receiver and mount one of my Berg receivers. I just don't trust the radio it came with, and there's no substitute for quality stuff.
2. The second thing I did after mounting the landing gear was to turn on my radio, hook up the battery and center all the trims. This is very important because the servos were not centered when they were installed. I had to mechanically trim the rudder, which was really off-center. The rest of the surfaces happened to be correctly centered, but your kit may vary. Unfortunately, the rudder and elevator servos are mounted inside the rear of the fuselage, so I had to use the clevis in the back to adjust the centering.
3. The next thing I did was to pull off the Hobby-Lobby sticker. I love Hobby-Lobby, but I didn't like the look of their sticker on my lovely new Pitts.
4. Then I attached the wings as the instructions say, using the nylon bolts, and using the zip ties to attach the braces. The zip ties are hard to tighten, so I used pliers to pull them tight. Be careful attaching the aileron connectors, because the horns bend easily.
5. I was not happy with the attachment of the braces, so I put a small amount of foam-safe CA to hold them in place. Be careful not to let it run around because it can bleed the colors from the decals. Wipe away any excess right away.
6. I also applied a little CA to the landing gear fairings to hold them in place.
7. I applied a little CA to the aileron connector horns so they don't rotate back and forth on the aileron.
8. I used some packing tape to secure the battery wires into the battery bay, so it doesn't pull itself back inside and make itself a real pain. Then I also put some hook-side of velcro into the battery bay to help hold the battery in place. I put loop velcro on the battery.
9. I am having trouble getting the battery into the place it's supposed to go, and the CG is going to be a little too far back with the battery they sent me, so I'll have to figure something else out. Maybe a bit of ballast will help, but I don't like doing that...
10. As a last step, I hooked up a really big, powerful battery and my watt meter. This is because I'm at high altitude and have had bad experiences over-amping motors using recommended setups. Results were: 7.4 amps, 84 watts - I would like to see a lot more for a plane of this weight for aerobatic performance, but this will be enough to make it fly.
The only thing left to do at this point is wait for a good day to fly! Here's a photo of the finished Pitts S2A Biplane - isn't she pretty! (Let's hope she stays that way, hehee)
(Click for bigger image)
Saturday, September 22, 2007

Sunday, August 19, 2007
Yak-55

Hobby-Lobby Yak-55 with a carbon fiber landing gear from another plane. I built this plane exactly as the instructions say, with no extra bracing - it was fragile.
Motor: Himax 2812-890 - almost too zippy for this plane.
Battery: Thunder Power 900mAh 3-cell
ESC: Castle Creations Thunderbird 18
Servos: 3x Hitec HS55
Prop: 10x4.7 APC Slow Flyer
RX: Castle Creations Berg 4L - 4 channel micro receiver, very good 72MHz.

This is my new one... all taped up and ready to go :)
This plane is completely covered with packing tape - this adds a ton of durability (See first video) but it also adds weight.
Motor: Hobby-Lobby 400XT - almost too zippy for this plane.
Battery: Thunder Power 900mAh 3-cell (or a 730 mAh 3-cell)
ESC: E-Flite 10-amp brushless
Servos: 3x Hitec HS55
Prop: 10x4.7 APC Slow Flyer
RX: Spektrum AR6100e.
Wednesday, August 15, 2007
Getting Started
OK, hopefully you came here before you bought anything. If you were smart like that, you should look into getting the GWS Slow Stick or the HobbyZone Super Cub. Those are the two best trainers out there and your local hobby shop should have them. The Super Cub is RTF(Ready to Fly) - meaning everything you need comes in one box. The Slow Stick is ARF (Almost Ready to Fly) - meaning you will have to buy a radio and a few other parts (this is detailed in my build log section - link on right side)
Before you buy anything, you should also check out the RCGroups beginners forum (link, right side of this page). Go there and register and read the "sticky" threads before you post. Don't ask what plane to start with... it's been asked and answered hundreds of times, and the answer is either Slow Stick if you want "real" stuff that you will be able to use on other planes in the future, and if you like building. The Super Cub is good if you don't like building and just want one complete plane that will get you up in the air fast. There are still some issues that you need to learn about before you toss it up in the air though - it is not "charge and fly" and many Super Cubs fly like crap out of the box - you will have to trim and balance it, so go to the forums and learn how to do that, or you will crash within seconds of takeoff. These things aren't easy to fly, and you should be prepared to crash, fix, crash, and fix again. If you're easily frustrated, this isn't a good hobby to get into. If you like to challenge yourself and learn something extremely rewarding, then it is a lot of fun. The Slow Stick will take a lot more abuse than the Super Cub, and once you finish building it, you'll know how to fix anything that you break.
You're going to spend about 200 bucks to do this right (probably more) but it is worth much more. If you want to go with the toy planes that are $40-$100 then pick any of the ones mentioned on the right side of this blog. I have tried some toy planes that aren't mentioned on here, and there's a reason why... they aren't worth buying. There are some VERY BAD toy planes out there, and all they do is crash and break, and I really wish that companies would stop making them. They scare people away from a hobby that can be very fulfilling if done right.
If you've already bought a plane, do yourself a favor and go to the forums mentioned above and get help to get your plane set up correctly before you try to fly it. If you've crashed it already, you know why I say this. If you haven't crashed it yet, you don't want to know why. If you are having trouble with a new plane and want to know why, the experts on the forums can tell you... just make sure you follow the rules when you post, be clear about what happened and exactly what plane you have. We'll get you all straightened out.
One last thing - if you know an experienced pilot who can train you, or if there is a model airplane club in your town - GO THERE and have them help you. A good trainer can teach you anything you need to know, and they should be willing to help set up your plane for you, they may have a plane of their own for you to fly, or they may simply teach you on your plane. They should not charge you for this, and if they ask for money, find someone else. There is no substitute for in-person help. Please don't get frustrated and trash your plane before you try these things!
Over and Out!
Jasmine
Tuesday, August 14, 2007

Wednesday, August 8, 2007
Most Common Noob Mistakes
[Adapted from this and my own experiences]
There are several things that new people do wrong almost universally, and a few things which people just don't know about ahead of time when they first try this hobby. It can be extremely frustrating to get this stuff wrong, because it often means you destroyed your plane. Please read this and get these things right before you fly. If it means you have to wait a couple weeks, trust me, it's worth it. I made these mistakes and nearly gave up on this stuff because of it. I also hurt myself very badly getting a plane out of a tree I shouldn't have been near in the first place. So please be sure to get this stuff right before you fly, and periodically refresh your memory until it becomes instinct. If you can't remember them all at first, make a checklist or print out this blog and take it to the field with you.
1. Buying the wrong plane - you should start with a high-wing trainer, like the Slow Stick or Super Cub. See the blog about Getting Started for more info about this issue. It is essential to start with the right plane. You won't be able to fly jet fighters or anything "cool" until you learn on something that might be a little less exciting, but it will be worth it if you start out with the right plane. Baby steps first, then walk, then run!
2. Too much wind - Flying in wind is difficult for experts and impossible for beginners. It may be frustrating to wait, but it's more frustrating to break your plane because you chose to fly in the wind. Wait until there is NO WIND AT ALL for your first flight. The best times for this are early in the morning before 10AM, and when I say no wind, I mean NONE. I still won't fly in winds over 5mph, and that is not very much wind. A 5mph wind barely tickles the leaves on the trees. Learn to watch the trees and flagpoles and check the weather on web sites before you go flying. This has nothing to do with your plane - it has to do with you. A very experienced pilot can fly in more wind, but a very experienced pilot usually knows better. It is common to go out to a field and see the experienced guys sitting around talking, while the newbies throw their planes into the wind and crash.
3. Ignoring wind direction - Wind direction is very important during takeoff and landing. At other times it is less important, but you should be aware of the wind direction at all times. ALWAYS take off and land going INTO THE WIND. Test this by throwing up grass blades before each flight, and be mindful of changes during your flight. I sometimes use a cigarette to test this in very light winds, but it's a bad idea to smoke or do anything else while you are flying. The wind can change direction while you are flying, and the wind is usually stronger at higher altitudes, and may be in a different direction as well. Since you can't go up there and test it yourself, you will have to observe your plane very carefully. If there is too much wind aloft, don't fight it. Land and fly another day. Land into the wind... always! There are hundreds of ways to explain this, but it's best to just trust me on this one. ALWAYS keep your plane upwind of yourself, and don't fly over your head. This is important if you lose power... your plane won't blow away from you, it will blow toward you.
4. Understanding orientation - This is something you just have to learn and get an instinct for. There are many ways to visualize it, but the basic point is that many beginners have a habit of turning the wrong direction when the plane is facing them. There are two things that helped me with this: simulators and visualization. I think everyone should practice on a simulator before going out to fly for real. The reasons for this should be obvious, but the one that applies here is learning your left from your right. There are simulator links on the right side of the page, but you want to get one that works with your actual transmitter, so it feels right when you go out to fly. The other way to understand orientation is to visualize yourself sitting in the plane, or imagine that you are actually facing the same direction as the plane. I will sometimes turn my controller to one side to reinforce this visualization. I also tend to ignore 'left' and 'right' and think in terms of 'clockwise' and 'counterclockwise', which are the same regardless of the direction your plane is facing (unless you're inverted). This comes in handy when flying helicopters too. Practice with a radio control car or a cheap plane like the Aero Ace.
5. Plane is not flight-ready - This can happen with RTF planes, so be careful even with these! Most RTF planes are not actually "Ready to fly" and they will need some adjustment before flight, and trimming as well. No plane can be trimmed properly before flight, so if you don't understand how to do this, get an expert to trim your plane for you. Be sure to check the Center of Gravity of your plane, and make sure it is in the manufacturers recommended location. This is probably the single biggest plane-related problem that beginners face. Get it right, or you're going down. Also check that everything works on your radio, all the control surfaces go the right directions and that everything is solidly put together. If you built the plane yourself you should be intimately familiar with it and check these things easily, but if you bought an RTF, be careful since many of them are not properly balanced and there are occasionally simple defects in the product itself. DO NOT FLY if any of these things are wrong.
6. Pilot is not flight-ready - Most of the beginner mistakes that are blamed on planes are, in my opinion, pilot error and not the fault of the plane. Make sure you are ready to fly. Practice in the simulator until you can fly very well without crashing. Practice landing, a lot. Keep the simulated plane out in front of you and at high altitude. The only reason I am a halfway decent pilot is because of hundreds of hours of simulator time, and I'm serious about that. I also have an understanding of how planes work mechanically and aerodynamically, and this helps a lot, but not as much as practice. Also, if you are easily frustrated, have high expectations, or other mental blocks, you are not flight-ready. Flying without confidence is a big mistake.
7. Flying in the wrong area - Make sure you have enough room to fly! For most slow trainer planes this means two football fields worth of space. That may seem like a lot, but trust me it's not. Also make sure there are no people or cars or trees or anything else in the area you intend to fly. It is also a good idea to check the legality issues. Stay away from airports, and if you're not at a designated club field, be sure it is legal to fly at the park, school, or whatever. Some places have outlawed flying because some dopehead probably crashed his plane into a house or a person(!), and you will make the problem worse for all of us if you ignore these laws!
8. Not enough altitude - Keep your plane away from the ground! Terra Firma is the enemy of your plane, and this becomes clear the first time you crash into it. Altitude gives you time to respond to mistakes before you hit the ground. Ideally, right after takeoff, you want to fly to at least 100 feet above ground, then trim your plane so it flies right, then have fun. Always fly high enough to recover from two or three mistakes. If you make a mistake, your plane almost always loses altitude. Once you get back into level flight, climb back up to a safe altitude before you 'try anything' again. Flying loops and such is fun, but if you don't have altitude, you're dead. Altitude is also 'stored energy' which you can use to gain speed if you lose power, so keep that in mind. In dogfighting, pilots learn early on that an altitude advantage can nearly always be used to kill your opponent if you have equally matched planes.
9. Misunderstanding speed - AIR speed (not ground speed) is key here. Too much and your plane will climb incessantly, too little and your plane won't hold altitude. Ideally your plane should be able to fly level with the throttle 1/2 to 2/3 of full power. If you have to use elevator to keep your plane from diving, then you need more throttle, and if you have to use elevator to keep your plane from climbing, you need to reduce the throttle. Remember, your plane is completely unaware of the ground, until it runs into it. What I mean is that you should disregard how fast it looks to you, and realize that when flying with the wind, it will appear to be moving faster, and when flying against the wind it will appear to be moving slower. Your plane doesn't care about this... it only sees the speed of the AIR. So, once you find the proper setting for level flight, use that setting for level flight, regardless of ground speed that you see. If you want to climb, use more throttle, and if you want to descend, use less.
10. Pre-flight setup - This includes many things and it might seem like a lot, but these things are absolutely critical to check every time you fly. Pilots of full-scale planes go through a much longer checklist than this every time they fly, because their lives are at stake. In your case, your plane is at stake, and the safety of people and property as well, so it's very important. I check these things every time I fly any of my planes. If you can't remember this stuff, print out a checklist and take it with you to the field.
Over and Out!
Jasmine
There are several things that new people do wrong almost universally, and a few things which people just don't know about ahead of time when they first try this hobby. It can be extremely frustrating to get this stuff wrong, because it often means you destroyed your plane. Please read this and get these things right before you fly. If it means you have to wait a couple weeks, trust me, it's worth it. I made these mistakes and nearly gave up on this stuff because of it. I also hurt myself very badly getting a plane out of a tree I shouldn't have been near in the first place. So please be sure to get this stuff right before you fly, and periodically refresh your memory until it becomes instinct. If you can't remember them all at first, make a checklist or print out this blog and take it to the field with you.
1. Buying the wrong plane - you should start with a high-wing trainer, like the Slow Stick or Super Cub. See the blog about Getting Started for more info about this issue. It is essential to start with the right plane. You won't be able to fly jet fighters or anything "cool" until you learn on something that might be a little less exciting, but it will be worth it if you start out with the right plane. Baby steps first, then walk, then run!
2. Too much wind - Flying in wind is difficult for experts and impossible for beginners. It may be frustrating to wait, but it's more frustrating to break your plane because you chose to fly in the wind. Wait until there is NO WIND AT ALL for your first flight. The best times for this are early in the morning before 10AM, and when I say no wind, I mean NONE. I still won't fly in winds over 5mph, and that is not very much wind. A 5mph wind barely tickles the leaves on the trees. Learn to watch the trees and flagpoles and check the weather on web sites before you go flying. This has nothing to do with your plane - it has to do with you. A very experienced pilot can fly in more wind, but a very experienced pilot usually knows better. It is common to go out to a field and see the experienced guys sitting around talking, while the newbies throw their planes into the wind and crash.
3. Ignoring wind direction - Wind direction is very important during takeoff and landing. At other times it is less important, but you should be aware of the wind direction at all times. ALWAYS take off and land going INTO THE WIND. Test this by throwing up grass blades before each flight, and be mindful of changes during your flight. I sometimes use a cigarette to test this in very light winds, but it's a bad idea to smoke or do anything else while you are flying. The wind can change direction while you are flying, and the wind is usually stronger at higher altitudes, and may be in a different direction as well. Since you can't go up there and test it yourself, you will have to observe your plane very carefully. If there is too much wind aloft, don't fight it. Land and fly another day. Land into the wind... always! There are hundreds of ways to explain this, but it's best to just trust me on this one. ALWAYS keep your plane upwind of yourself, and don't fly over your head. This is important if you lose power... your plane won't blow away from you, it will blow toward you.
4. Understanding orientation - This is something you just have to learn and get an instinct for. There are many ways to visualize it, but the basic point is that many beginners have a habit of turning the wrong direction when the plane is facing them. There are two things that helped me with this: simulators and visualization. I think everyone should practice on a simulator before going out to fly for real. The reasons for this should be obvious, but the one that applies here is learning your left from your right. There are simulator links on the right side of the page, but you want to get one that works with your actual transmitter, so it feels right when you go out to fly. The other way to understand orientation is to visualize yourself sitting in the plane, or imagine that you are actually facing the same direction as the plane. I will sometimes turn my controller to one side to reinforce this visualization. I also tend to ignore 'left' and 'right' and think in terms of 'clockwise' and 'counterclockwise', which are the same regardless of the direction your plane is facing (unless you're inverted). This comes in handy when flying helicopters too. Practice with a radio control car or a cheap plane like the Aero Ace.
5. Plane is not flight-ready - This can happen with RTF planes, so be careful even with these! Most RTF planes are not actually "Ready to fly" and they will need some adjustment before flight, and trimming as well. No plane can be trimmed properly before flight, so if you don't understand how to do this, get an expert to trim your plane for you. Be sure to check the Center of Gravity of your plane, and make sure it is in the manufacturers recommended location. This is probably the single biggest plane-related problem that beginners face. Get it right, or you're going down. Also check that everything works on your radio, all the control surfaces go the right directions and that everything is solidly put together. If you built the plane yourself you should be intimately familiar with it and check these things easily, but if you bought an RTF, be careful since many of them are not properly balanced and there are occasionally simple defects in the product itself. DO NOT FLY if any of these things are wrong.
6. Pilot is not flight-ready - Most of the beginner mistakes that are blamed on planes are, in my opinion, pilot error and not the fault of the plane. Make sure you are ready to fly. Practice in the simulator until you can fly very well without crashing. Practice landing, a lot. Keep the simulated plane out in front of you and at high altitude. The only reason I am a halfway decent pilot is because of hundreds of hours of simulator time, and I'm serious about that. I also have an understanding of how planes work mechanically and aerodynamically, and this helps a lot, but not as much as practice. Also, if you are easily frustrated, have high expectations, or other mental blocks, you are not flight-ready. Flying without confidence is a big mistake.
7. Flying in the wrong area - Make sure you have enough room to fly! For most slow trainer planes this means two football fields worth of space. That may seem like a lot, but trust me it's not. Also make sure there are no people or cars or trees or anything else in the area you intend to fly. It is also a good idea to check the legality issues. Stay away from airports, and if you're not at a designated club field, be sure it is legal to fly at the park, school, or whatever. Some places have outlawed flying because some dopehead probably crashed his plane into a house or a person(!), and you will make the problem worse for all of us if you ignore these laws!
8. Not enough altitude - Keep your plane away from the ground! Terra Firma is the enemy of your plane, and this becomes clear the first time you crash into it. Altitude gives you time to respond to mistakes before you hit the ground. Ideally, right after takeoff, you want to fly to at least 100 feet above ground, then trim your plane so it flies right, then have fun. Always fly high enough to recover from two or three mistakes. If you make a mistake, your plane almost always loses altitude. Once you get back into level flight, climb back up to a safe altitude before you 'try anything' again. Flying loops and such is fun, but if you don't have altitude, you're dead. Altitude is also 'stored energy' which you can use to gain speed if you lose power, so keep that in mind. In dogfighting, pilots learn early on that an altitude advantage can nearly always be used to kill your opponent if you have equally matched planes.
9. Misunderstanding speed - AIR speed (not ground speed) is key here. Too much and your plane will climb incessantly, too little and your plane won't hold altitude. Ideally your plane should be able to fly level with the throttle 1/2 to 2/3 of full power. If you have to use elevator to keep your plane from diving, then you need more throttle, and if you have to use elevator to keep your plane from climbing, you need to reduce the throttle. Remember, your plane is completely unaware of the ground, until it runs into it. What I mean is that you should disregard how fast it looks to you, and realize that when flying with the wind, it will appear to be moving faster, and when flying against the wind it will appear to be moving slower. Your plane doesn't care about this... it only sees the speed of the AIR. So, once you find the proper setting for level flight, use that setting for level flight, regardless of ground speed that you see. If you want to climb, use more throttle, and if you want to descend, use less.
10. Pre-flight setup - This includes many things and it might seem like a lot, but these things are absolutely critical to check every time you fly. Pilots of full-scale planes go through a much longer checklist than this every time they fly, because their lives are at stake. In your case, your plane is at stake, and the safety of people and property as well, so it's very important. I check these things every time I fly any of my planes. If you can't remember this stuff, print out a checklist and take it with you to the field.
- Are the batteries charged up or do you enough fuel in the tanks.
- Are the control surfaces properly aligned and secured to the pushrods and servos
- Is there any damage to the plane - do not fly if there is!
- Is your channel clear? DO NOT TURN ON YOUR RADIO IF SOMEONE IS USING YOUR CHANNEL! You will "shoot down" their plane, and they will be very upset with you. If you're flying at a club, they should have a board to reserve your channel and tell you if someone is currently using it or waiting for you to get off it. If you're not at a club, be sure to ask everyone what channels they are using.
- Did you do a range check today? Check it for each plane.
- Be sure your radio battery is charged up, and also the receiver battery if you're flying glow. Best to do this the night before!
- If you have flown this plane before, check the trim knobs and be sure they are correct for this plane
- Do all the control surfaces move in the correct directions?
- Is your antenna pulled up all the way? (I've seen people take off without this, and you'll lose control eventually this way)
- Are you taking off in the right direction (see above) and is your flight path clear of people and obstacles?
- Do you have everything you need for yourself? Bug spray, sunscreen, sunglasses, a lawn chair if you're flying the Slow Stick! Don't forget to bring water and maybe some ice. A first aid kit and cell phone are handy as well, just in case!
Over and Out!
Jasmine
Wednesday, August 1, 2007
Great Planes Flatana

This is before I put the motor on. This plane didn't fly very well and I had to fix it after the first flight/crash.
Sunday, July 29, 2007


Aero Ace Biplane

Aero Ace Biplane - (Air Hogs, $30) beat up and still going strong - highly recommended for new pilots! Seriously... get this thing.

Saturday, July 28, 2007
GWS Slow Stick

GWS Slow Stick with brushless motor.
Here's a bunch of onboard videos, and at the end is the night flyer version.
Wednesday, July 25, 2007
Build Log: GWS Slow Stick
NOTE: I've made some changes to the plane due to a spectacular crash, which is less fun than it sounds. I'll post photos of the new setup with a brushless motor after the glue dries :)
So, I wasn't going to write this, because I figured it out OK, but I realized when looking through the forums, that many people have trouble assembling the Slow Stick, and that beginners are not sure of what to buy for a flight pack. I also think it's important to delineate somewhere what the total cost of this plane really is, in time and money. Right up front I will tell you, it was $313.28 for all the parts I needed and about 6 hours of assembly time. However, I didn't mind it because I'm currently immobilized due to a "messed up" (doc's words, not mine) ankle. I hurt myself pretty badly getting an Estes Sky Ranger out of a tree. The Sky Ranger just doesn't fly very well at all, and that's to be expected because it is truly a $40 and ready-to-fly RC airplane. You have to do a lot of work just to keep it in the air, and it really only flies well when it's going straight into the wind. You get what you pay for with the cheap park flyers, and in my case that's about 200 bucks of medical bills. Now, I'm not saying to avoid the cheap park flyers, just make sure that you have lots of space (more than a football field) and you are not easily frustrated. It took me 3 separate flying sessions to figure out how to make the Sky Ranger stay up in the air, and then I crashed it in a tree (and it was just when I was starting to have fun with it).
So, in my frustration over planes that are so horrible that they lead to injuries, I went to a hobby shop in search of a REAL RC plane. I knew I either wanted the Slow Stick, or the Parkzone Slo-V, but the Parkzone is ready-to-fly, and with my bum ankle I kind of wanted something to keep myself busy with. The Slow Stick requires some assembly, and it affords you the option of purchasing equipment you can use with other planes in the future. All of the parts listed below could be useful on other planes, and it's up to me whether I want to remove it from the Slow Stick or buy another one. So here goes, here's how I built my Slow Stick!
The Parts List
GWS Slow Stick Kit ($34.98)
This is the basic kit, which includes the basic parts of the plane, and the motor and propeller. It's cheap, but it's not functional by itself.
Hitech Laser 4 Transmitter/Radio Kit ($117.98)

This radio kit came with the transmitter, and also the parts which are mounted on the plane. When you buy your radio, it will come with servos and a receiver which must be mounted on the plane. Same for the receiver. The servos and receiver are powered by a Ni-MH battery pack that came with the radio. You can buy extra receivers and servos, and the kit came with two extra servos that I didn't need for the Slow Stick (they would be for ailerons, which are not present on this plane). Overall this is a pretty important purchase, since you will be using this transmitter for other planes... hopefully ALL of them. Don't skimp on this one. Get a good one. This one I bought is about as cheap as you can go for a good radio. GWS sells some cheaper ones, but I don't think they are as good. This is the most expensive part you will purchase for your hobby, but don't be cheap... get a quality radio that will last a long time... otherwise you'll end up buying other ones, and your costs will soar higher than the planes you're building.
Thunder Power 3-Cell Li-po battery ($54.98)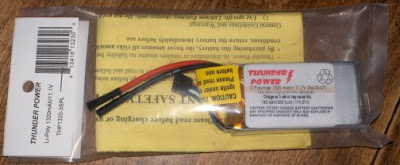
OK, here's where you have some options. You need a good battery pack to power the motor. I chose this 3-cell Li-Po battery, which was a little expensive. You can go as low as 20 bucks on this one, for a Ni-MH pack, but I think a good Li-Po battery is a smart purchase. They are somewhat dangerous to mess around with and you have to be careful charging them and connecting and disconnecting them to avoid fire. However, the risk of fire with a Li-Po battery is less than that of gasoline, and if you're smart about it, you'll be fine. Electric power is the wave of the future, and messing around with gasoline is just a dirty pain in the butt. Li-Po will give you better power and less weight (important on an airplane). So, note that you have two power sources on the completed plane. These batteries are not 100% charged up on the first time, so you'll need to drain it and recharge it at least once before you fly. The best way to do this is after you finish the plane. Simply block the plane's forward movement somehow and run it at less than full throttle, until the ESC cuts off the power. It's not a good idea to put a Li-Po battery under heavy load until it has been 'broken in', so don't run it at full throttle for a long time until you have cycled the battery a few times. After your test, allow the battery to cool for about 15 minutes, then recharge it. Use a clock for this - 15 minutes is longer than you think! The first time I didn't check, but the second cycle on this battery gave me a little over 20 minutes of continuous running at 50% throttle.
Electrifly Electronic Speed Controller (ESC) ($34.98)
This is another fairly important part. It serves two purposes - it controls the throttle power via the receiver, and it protects the battery from over-discharging. This one I bought is a little better than the minimum requirement, and it will be able to run a slightly more powerful motor if I want to change motors in the future. This ESC needs to be programmed for this type of battery, and it only works with standard brushed motors. If you want to go with a brushless motor, you will need a different kind of ESC. The GWS kit comes with a brushed motor, so this is a good controller to start with. It has plugs for connections, but you'll need to cut and solder those to the motor wires. The GWS motor is already loaded with capacitors, so you won't need those, but they are included with the ESC.
Eflite Celectra Li-Po battery charger ($44.98)
This battery charger is fairly simple, and requires a 12V DC source for power. I have a thing that turns a wall outlet into a car cigarette lighter, and then I bought an adapter so I can plug this into my car as well. The charging leads on this had to be modified to fit my battery. I will explain below.
Plug Adapter for battery ($3.25)
The battery comes with bare wires, so you need a nice plug to use it. The plug needs to be soldered on to the battery, and you'll need to be really careful doing this because you don't want to heat up the battery wires too much - it's a Li-Po. Also make sure you don't strip the positive wire until you have completely soldered and insulated the negative terminal, because short-circuiting a Li-Po battery is asking for trouble. There is a male plug on the ESC already, so I put the female plug on the battery, and I used the male side of this kit to make a nice plug for the battery charger. I used plenty of electrical tape to insulate this, lock the wires in place and to give me something to grab onto. I can't seem to get a good grip on these ultra plugs so I always put a little tape on them, even if they already have heat-shrink, which you should use if you can get it on there.
Assembling the Plane
Although the instructions are written in poor English, they are reasonably easy to understand. I'll mention a few things here that aren't covered in the instructions or are not clear from the instructions. If you have additional questions, please post them in the comments and I will answer them there for everyone to see. Please do not send me a private email about this... any help on this subject really should be made public. The first page of instructions requires you to complete the tail assembly. You need to cut the foam of the tail and the stabilizer in order to make the control surfaces movable. Use a very sharp razor blade in your box cutter to do this. It does not need to be a 45-degree angle, as 45-degrees will be way more space than you need for control surface movement. Basically, you will make a V-groove by cutting some foam away from one side of the fold. You need to check the proper side to do this for. It may be incorrect in the picture in your instructions. One side of the foam will be pre-cut more deeply and the other side will be uncut. Put tape over the UNCUT side, and dig out your V-groove on the other side. The photo shows what this will look like when you are done.
The instructions weren't exactly clear on this and I did it wrong the first time, but you need to put the battery mounts IN FRONT of the wings if you use the Li-Po battery, and follow the diagrams if you are using the NiMH batteries. It is a pain to remove everything and re-order the parts when you have the plane completely finished, so don't make this mistake if you can avoid it. The position of the battery will affect the center of gravity (CG) of the plane, and you want the CG to be in the front section of the wing. If it is balanced too far to the rear, the plane will be unstable, and if too far forward, the plane will be hard to turn. I had to put my receiver under the fuselage, instead of above as noted in the diagrams, because my receiver was too big and it kept running into the wings and the wings wouldn't mount properly. The photo shows where I had to mount everything.

So, the next thing I had to do was figure out my battery pack and charger. I mention above how I had to do that, in the section about the battery. Here's a photo of the finished plug from the battery. The plug on the charger was done the same way.
Probably one of the first mods I will make on this plane is to fix the taildragger wheel. The parts that are supposed to hold the wheel on do not fit, so I had to use a different part with a smaller hole in it. I got a few extra plastic parts in the Slow Stick kit, so I used one of those to fix the wheel onto the wire. I don't like this taildragger part because it doesn't turn. This makes it hard to taxi the plane on the ground, which would be convenient if you landed some distance away. You could taxi the plane back to where you were standing, rather than walking over to pick it up. With my ankle the way it is, this seems like a good feature to have. The photo shows how I attached my tail wheel.
That's about it. The rest of the instructions are fairly easy to understand in spite of the bad English. If you have any questions, please post them. The electric flyer community
will appreciate it!
Happy flying!
Jasmine
Subscribe to:
Posts (Atom)