
Havoc Helicopter (Air Hogs, $29)


NOTE: I've made some changes to the plane due to a spectacular crash, which is less fun than it sounds. I'll post photos of the new setup with a brushless motor after the glue dries :)
So, I wasn't going to write this, because I figured it out OK, but I realized when looking through the forums, that many people have trouble assembling the Slow Stick, and that beginners are not sure of what to buy for a flight pack. I also think it's important to delineate somewhere what the total cost of this plane really is, in time and money. Right up front I will tell you, it was $313.28 for all the parts I needed and about 6 hours of assembly time. However, I didn't mind it because I'm currently immobilized due to a "messed up" (doc's words, not mine) ankle. I hurt myself pretty badly getting an Estes Sky Ranger out of a tree. The Sky Ranger just doesn't fly very well at all, and that's to be expected because it is truly a $40 and ready-to-fly RC airplane. You have to do a lot of work just to keep it in the air, and it really only flies well when it's going straight into the wind. You get what you pay for with the cheap park flyers, and in my case that's about 200 bucks of medical bills. Now, I'm not saying to avoid the cheap park flyers, just make sure that you have lots of space (more than a football field) and you are not easily frustrated. It took me 3 separate flying sessions to figure out how to make the Sky Ranger stay up in the air, and then I crashed it in a tree (and it was just when I was starting to have fun with it).
The Parts List
GWS Slow Stick Kit ($34.98)
This is the basic kit, which includes the basic parts of the plane, and the motor and propeller. It's cheap, but it's not functional by itself.

This radio kit came with the transmitter, and also the parts which are mounted on the plane. When you buy your radio, it will come with servos and a receiver which must be mounted on the plane. Same for the receiver. The servos and receiver are powered by a Ni-MH battery pack that came with the radio. You can buy extra receivers and servos, and the kit came with two extra servos that I didn't need for the Slow Stick (they would be for ailerons, which are not present on this plane). Overall this is a pretty important purchase, since you will be using this transmitter for other planes... hopefully ALL of them. Don't skimp on this one. Get a good one. This one I bought is about as cheap as you can go for a good radio. GWS sells some cheaper ones, but I don't think they are as good. This is the most expensive part you will purchase for your hobby, but don't be cheap... get a quality radio that will last a long time... otherwise you'll end up buying other ones, and your costs will soar higher than the planes you're building.
Thunder Power 3-Cell Li-po battery ($54.98)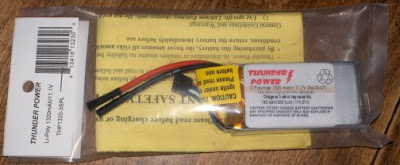
OK, here's where you have some options. You need a good battery pack to power the motor. I chose this 3-cell Li-Po battery, which was a little expensive. You can go as low as 20 bucks on this one, for a Ni-MH pack, but I think a good Li-Po battery is a smart purchase. They are somewhat dangerous to mess around with and you have to be careful charging them and connecting and disconnecting them to avoid fire. However, the risk of fire with a Li-Po battery is less than that of gasoline, and if you're smart about it, you'll be fine. Electric power is the wave of the future, and messing around with gasoline is just a dirty pain in the butt. Li-Po will give you better power and less weight (important on an airplane). So, note that you have two power sources on the completed plane. These batteries are not 100% charged up on the first time, so you'll need to drain it and recharge it at least once before you fly. The best way to do this is after you finish the plane. Simply block the plane's forward movement somehow and run it at less than full throttle, until the ESC cuts off the power. It's not a good idea to put a Li-Po battery under heavy load until it has been 'broken in', so don't run it at full throttle for a long time until you have cycled the battery a few times. After your test, allow the battery to cool for about 15 minutes, then recharge it. Use a clock for this - 15 minutes is longer than you think! The first time I didn't check, but the second cycle on this battery gave me a little over 20 minutes of continuous running at 50% throttle.
Electrifly Electronic Speed Controller (ESC) ($34.98)
This is another fairly important part. It serves two purposes - it controls the throttle power via the receiver, and it protects the battery from over-discharging. This one I bought is a little better than the minimum requirement, and it will be able to run a slightly more powerful motor if I want to change motors in the future. This ESC needs to be programmed for this type of battery, and it only works with standard brushed motors. If you want to go with a brushless motor, you will need a different kind of ESC. The GWS kit comes with a brushed motor, so this is a good controller to start with. It has plugs for connections, but you'll need to cut and solder those to the motor wires. The GWS motor is already loaded with capacitors, so you won't need those, but they are included with the ESC.
Eflite Celectra Li-Po battery charger ($44.98)
This battery charger is fairly simple, and requires a 12V DC source for power. I have a thing that turns a wall outlet into a car cigarette lighter, and then I bought an adapter so I can plug this into my car as well. The charging leads on this had to be modified to fit my battery. I will explain below.
Plug Adapter for battery ($3.25)
The battery comes with bare wires, so you need a nice plug to use it. The plug needs to be soldered on to the battery, and you'll need to be really careful doing this because you don't want to heat up the battery wires too much - it's a Li-Po. Also make sure you don't strip the positive wire until you have completely soldered and insulated the negative terminal, because short-circuiting a Li-Po battery is asking for trouble. There is a male plug on the ESC already, so I put the female plug on the battery, and I used the male side of this kit to make a nice plug for the battery charger. I used plenty of electrical tape to insulate this, lock the wires in place and to give me something to grab onto. I can't seem to get a good grip on these ultra plugs so I always put a little tape on them, even if they already have heat-shrink, which you should use if you can get it on there.
Assembling the Plane
Although the instructions are written in poor English, they are reasonably easy to understand. I'll mention a few things here that aren't covered in the instructions or are not clear from the instructions. If you have additional questions, please post them in the comments and I will answer them there for everyone to see. Please do not send me a private email about this... any help on this subject really should be made public. The first page of instructions requires you to complete the tail assembly. You need to cut the foam of the tail and the stabilizer in order to make the control surfaces movable. Use a very sharp razor blade in your box cutter to do this. It does not need to be a 45-degree angle, as 45-degrees will be way more space than you need for control surface movement. Basically, you will make a V-groove by cutting some foam away from one side of the fold. You need to check the proper side to do this for. It may be incorrect in the picture in your instructions. One side of the foam will be pre-cut more deeply and the other side will be uncut. Put tape over the UNCUT side, and dig out your V-groove on the other side. The photo shows what this will look like when you are done.
The instructions weren't exactly clear on this and I did it wrong the first time, but you need to put the battery mounts IN FRONT of the wings if you use the Li-Po battery, and follow the diagrams if you are using the NiMH batteries. It is a pain to remove everything and re-order the parts when you have the plane completely finished, so don't make this mistake if you can avoid it. The position of the battery will affect the center of gravity (CG) of the plane, and you want the CG to be in the front section of the wing. If it is balanced too far to the rear, the plane will be unstable, and if too far forward, the plane will be hard to turn. I had to put my receiver under the fuselage, instead of above as noted in the diagrams, because my receiver was too big and it kept running into the wings and the wings wouldn't mount properly. The photo shows where I had to mount everything.

So, the next thing I had to do was figure out my battery pack and charger. I mention above how I had to do that, in the section about the battery. Here's a photo of the finished plug from the battery. The plug on the charger was done the same way.
Probably one of the first mods I will make on this plane is to fix the taildragger wheel. The parts that are supposed to hold the wheel on do not fit, so I had to use a different part with a smaller hole in it. I got a few extra plastic parts in the Slow Stick kit, so I used one of those to fix the wheel onto the wire. I don't like this taildragger part because it doesn't turn. This makes it hard to taxi the plane on the ground, which would be convenient if you landed some distance away. You could taxi the plane back to where you were standing, rather than walking over to pick it up. With my ankle the way it is, this seems like a good feature to have. The photo shows how I attached my tail wheel.
That's about it. The rest of the instructions are fairly easy to understand in spite of the bad English. If you have any questions, please post them. The electric flyer community
will appreciate it!
Happy flying!
Jasmine


